
👩🏽🏫Writing recipes is a strong ESL lesson activity because it uses real-world language with a clear, simple structure. Students practice sequencing words like first, next, and finally while using action verbs such as mix, chop, and pour. The topic is familiar to the students and culturally flexible, which increases engagement. Also…everyone loves food!
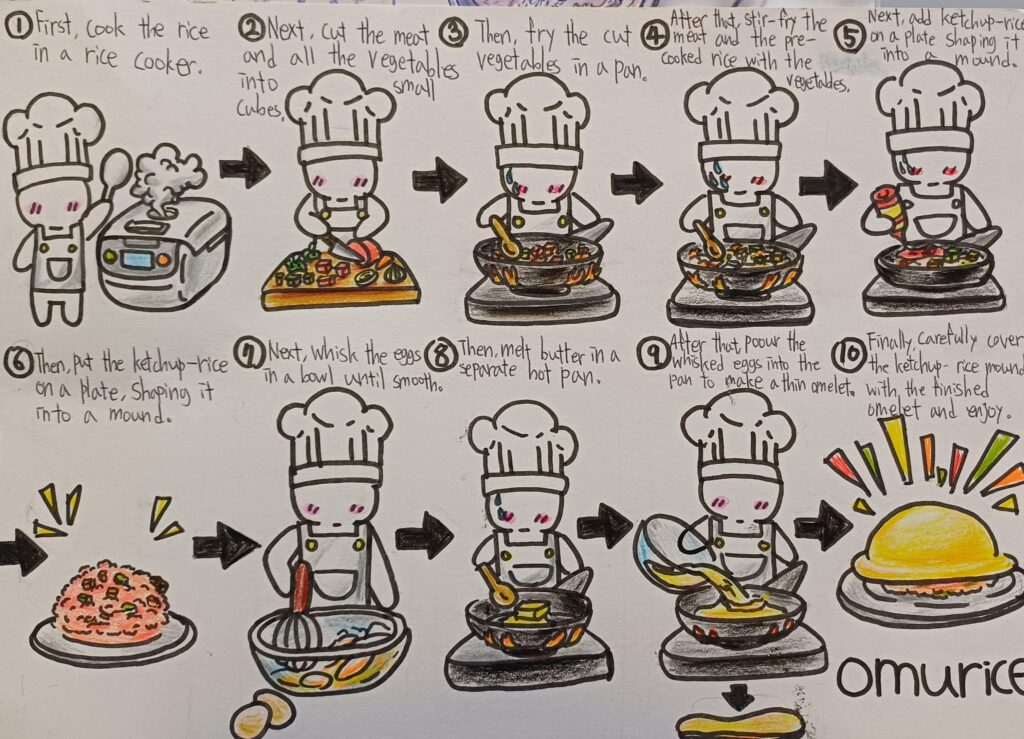
As an ESL teacher, you will find recipe-writing lessons effective for both beginners and higher-level students. Below are a few examples of recipes my students designed in a university-level class. You can click on each image to enlarge it. What do you think of them? Pretty cool, huh?
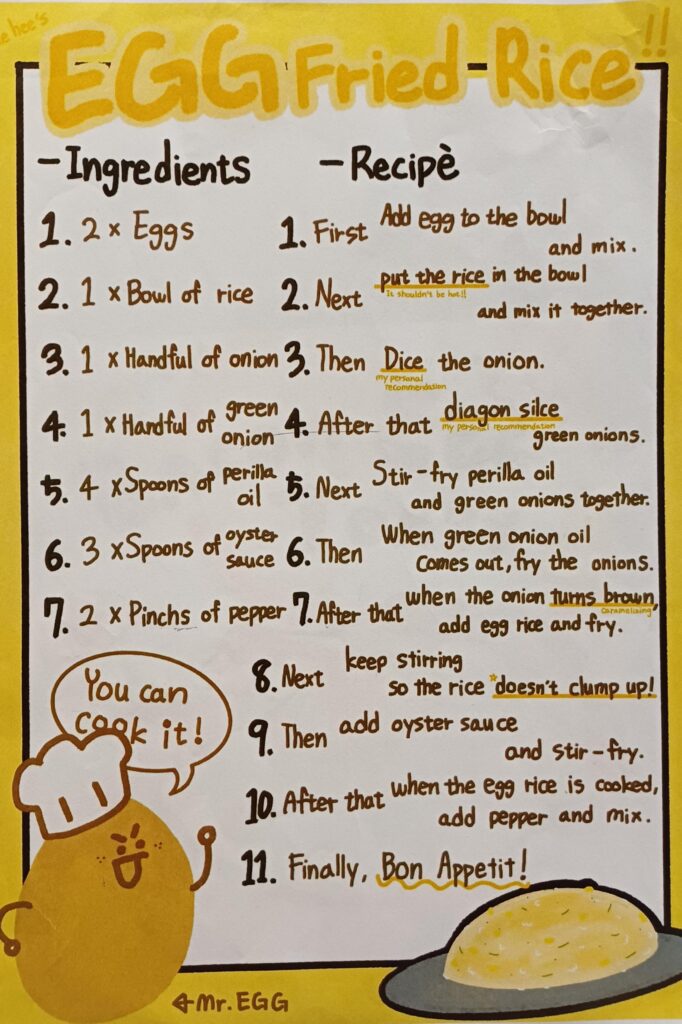
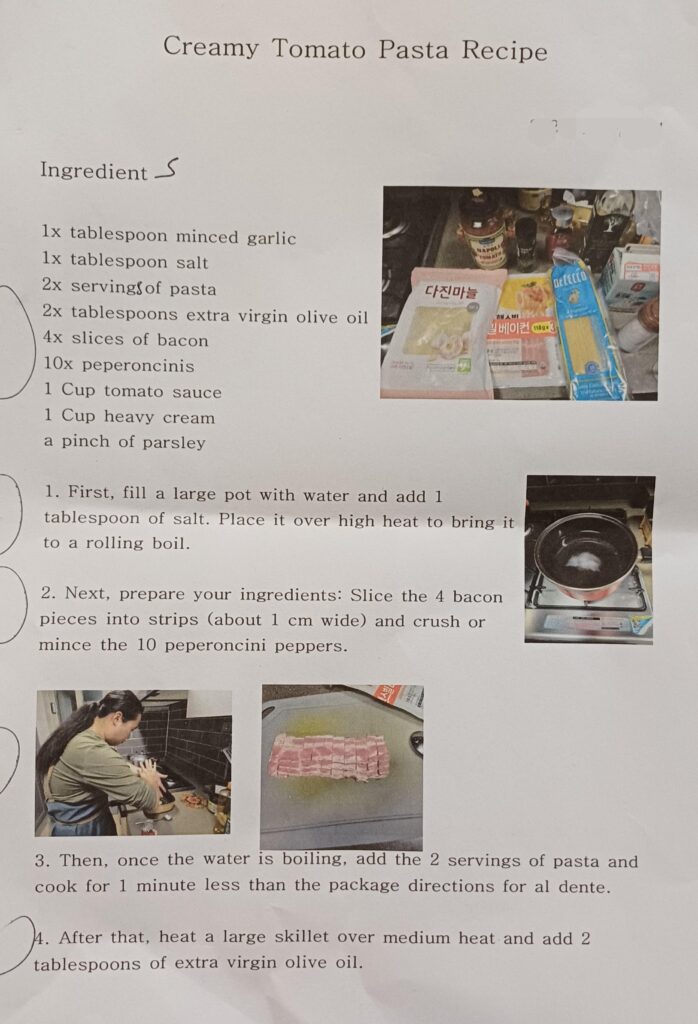
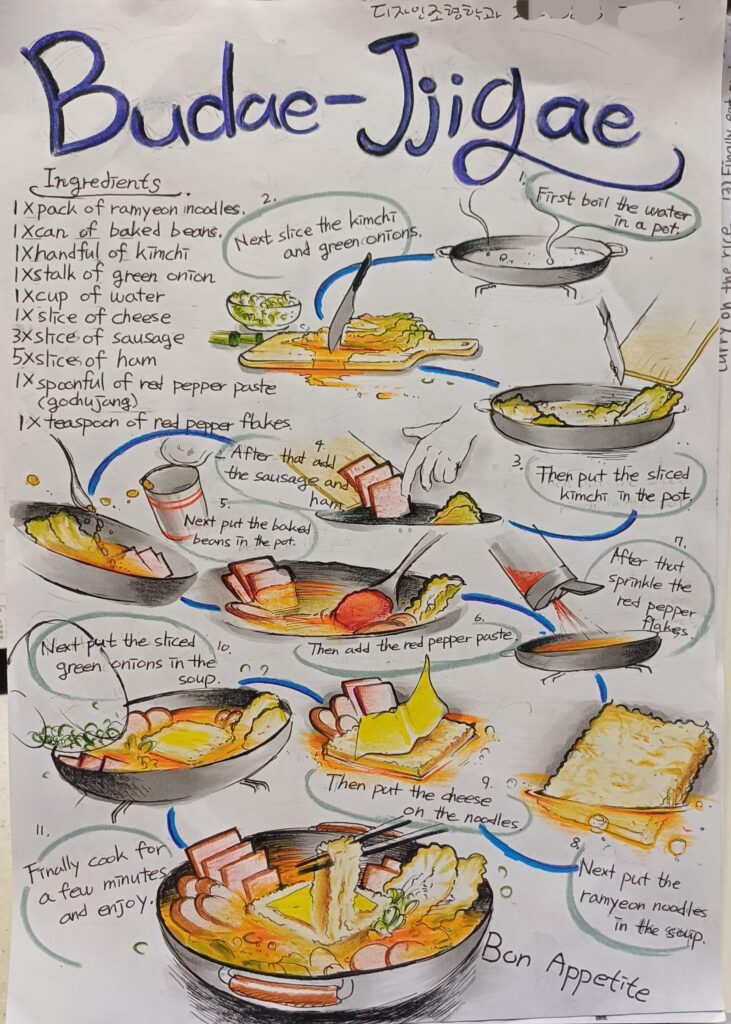
👩🏽🏫 What I try to encourage the students to do is to be as creative as possible with their work. Combining other skills the students might have with the actual writing task ( coloring, computer graphics, cooking) makes the whole thing much more interesting for them. As you can see from the examples, they have risen to the task. I have taught this lesson numerous times and have collected a good cross-section of previous students’ work. Now, each time I introduce the writing task to a new class, I lay out the previous work on some desks for them to inspect. I show them high-level, middle-level, and low-level examples (usually just a scrap of paper, lol). This helps the students see exactly what is expected of them for the task, and of course, they always focus on the high-level examples.
The Lesson Plan
👩🏽🏫The teacher first models the writing exercise on the board with an example recipe. The example recipe should be simple and include both countable and uncountable ingredients, such as a…
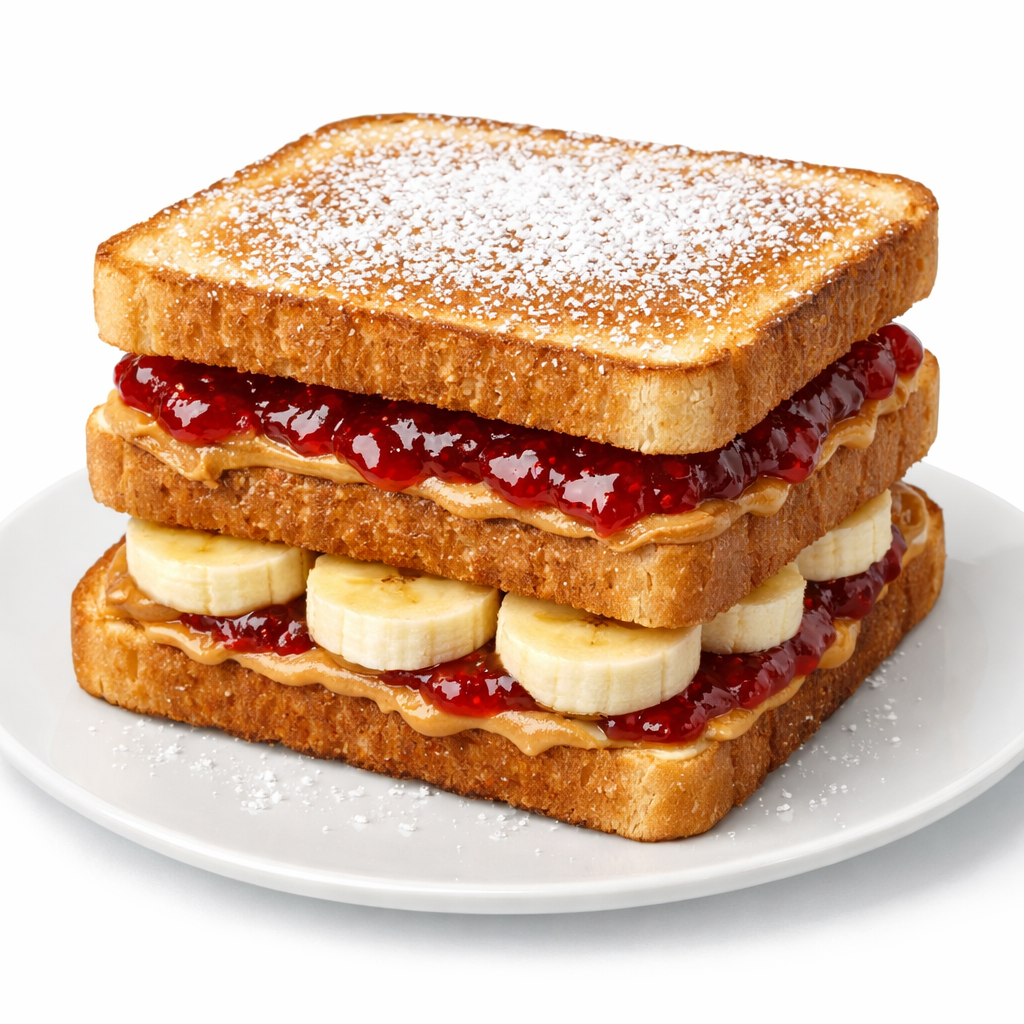
Banana, Peanut Butter, and Jam Toasted Sandwich!
The teacher explains that before they can write the recipe, they need a list of ingredients, which are the various foods needed to write the recipe.
The Ingredients
First, the teacher shows the students a picture of the sandwich.
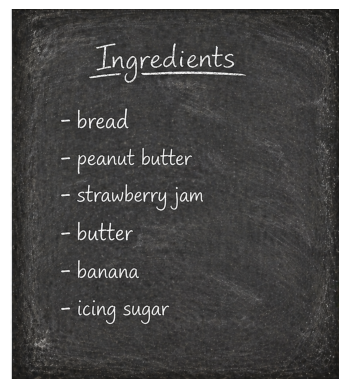
Next, the teacher writes the word ‘Ingredients’ on the board and asks the students to call out the ingredients they think should be included in the sandwich recipe.
Eventually, with the students’ help, the teacher will have written out the completed list of ingredients needed to write the recipe, as shown in the picture.
The teacher explains that to complete the list, the exact amounts of each ingredient are required. This is the perfect time to discuss the concept of countable and uncountable nouns and the use of counters (classifiers) for foods that are uncountable.
The teacher asks how many of the ingredients on the list are countable. (There is only one… a banana!). The teacher now asks the students how many bananas they will need for the sandwich recipe.
The teacher writes ‘1’ next to the banana on the board. Next, the teacher introduces the concept of counters for uncountable foods. They go down the list, eliciting responses from the students and teaching them the various counters for each food. For example:
T: What is a good counter for bread?
Ss: Slice
T: Yes, and how many slices of bread do you think we need?
Ss: Three slices
Now the teacher can continue asking the students “How many/much…?” questions and writing their answers on the board…
‘How many spoonfuls of peanut butter?’
‘Next, how many spoonfuls of jam?’
‘How many knobs of butter?’
Lastly, how much icing sugar?
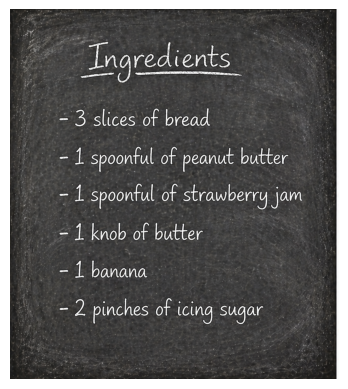
Finally, the board will show the completed list of the exact amount of ingredients needed for the recipe.
The Recipe
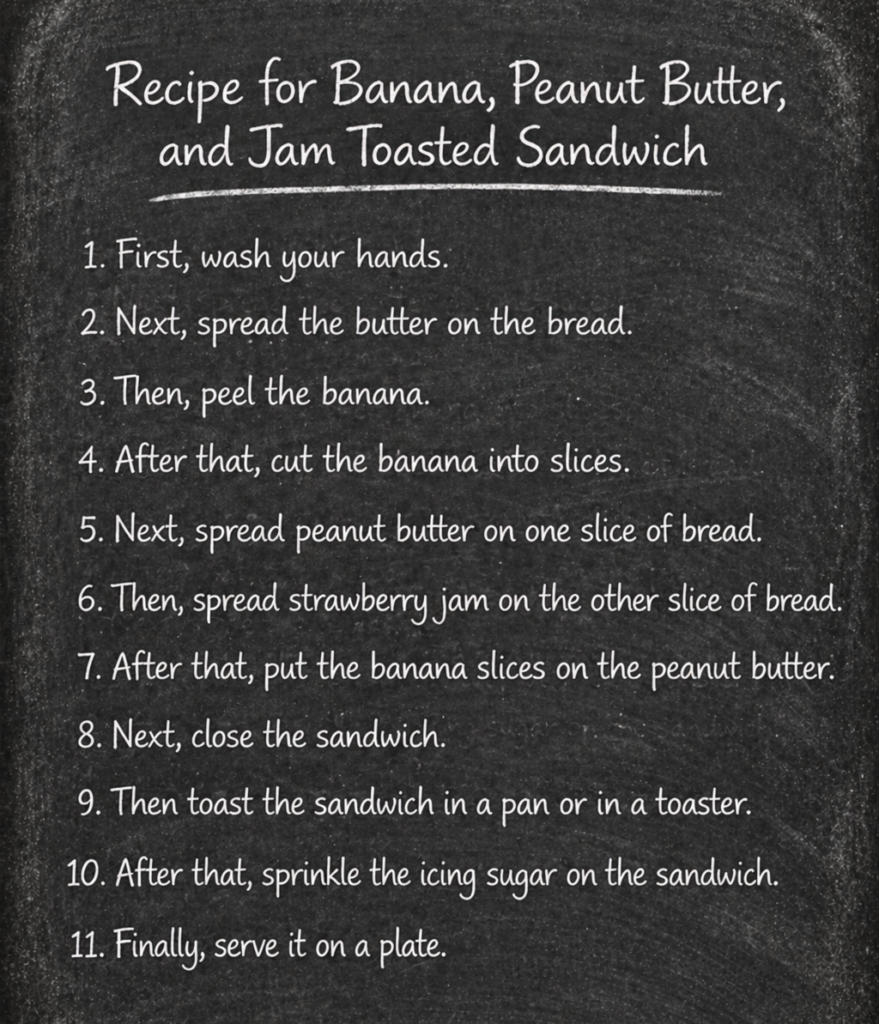
Now the focus can move on to writing out the recipe. The teacher explains that a recipe is a list of instructions, so for each instruction sentence, a verb is needed. The teacher writes a ‘verb ball’ up on the board containing all of the required verbs. They then write out a list of eleven numbers on the board. To begin each instruction, the teacher includes a sequencing word:
First – Next- Then – After that -Finally
The teacher asks the students what the first verb they need is to begin writing the recipe, and the students look at the verb ball. Eventually, one student will correctly identify the first verb, which is wash.
T: What do I wash?
SS: Your hands.
T: Good, so what’s the first instruction?
SS: Wash your hands
In this way, the teacher writes up the first few instructions with the students.
- First, wash your hands.
- Next, spread the butter on the bread.
- Then peel the banana
Now it is the students’ turn, in pairs, to look at the ingredients and pair them with verbs in the ball to complete the recipe.
Once the students have completed the task, the teacher returns to the board and, with the students’ help, writes out the rest of the recipe’s instructions. So the final board picture with the completed recipe will look something like this:
The Student’s Turn
So now it’s the students’ turn to write out their own recipe. This can be done in class or as a homework project. I prefer the homework option, and as you can see from one of the examples above, the students often (with their mom’s permission and help) want to make the recipe themselves and add photos to each recipe’s instructions. Lastly, I tell the students of the traditional rule for this homework…‘If you make something super delicious, like chocolate brownies, you must bring one in for me to try. It’s an ancient tradition!’
Giving Feedback to the Students
Hopefully, your students have risen to the challenge and are now proudly waving their recipes, anxious to show you their work. When I check their work, I prefer to do it in real time with the students. I remember to take my time and show genuine interest in their work, asking each student questions about their recipe and how they designed it. When the student has clearly put time and effort into their work, I lavish praise on them. One of the most satisfying things for me as a teacher is seeing one of my students bursting with pride as I genuinely gush over their great work.
It is almost always the case that the students who have designed the best recipes have also nailed it with the English writing side of the project (When possible, I also display their recipes on the classroom/ hall wall as I have described here)
Bon Appétit!…..see you in the next lesson.